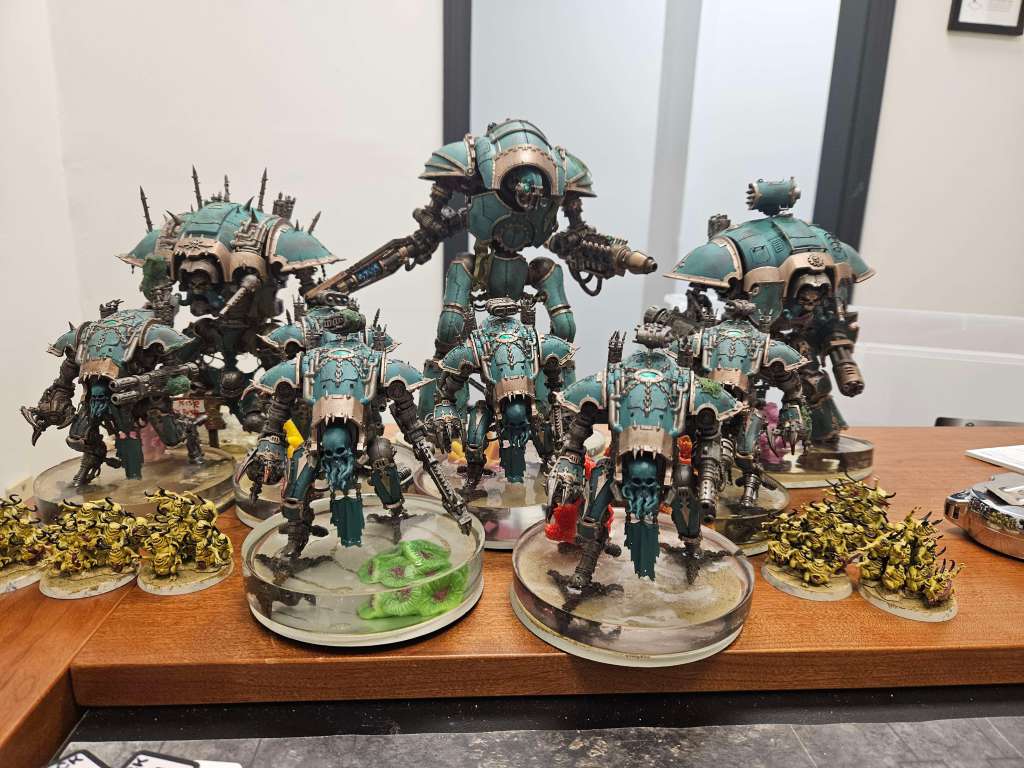
• The Lists

    CK (Infernal Lance):
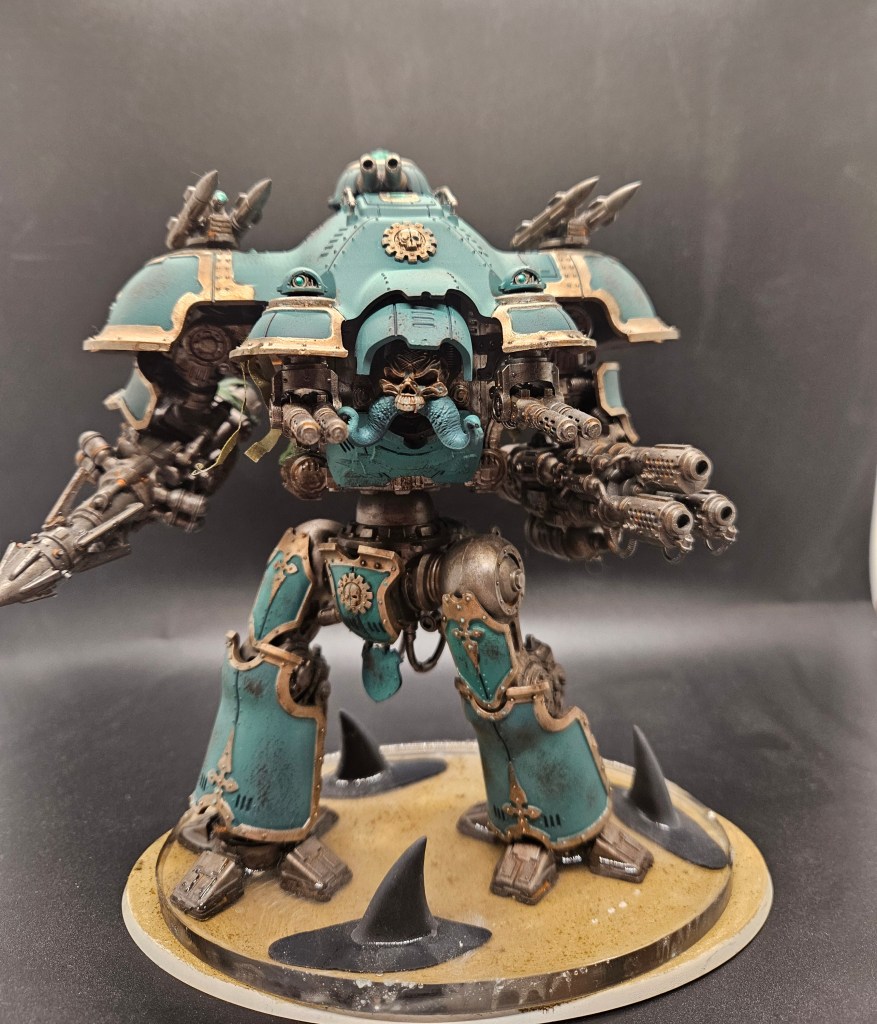
    Knight Tyrant w/ Bestial Aspect (Volcano lance/Plasma)
    3x Gatling Despoiler
    Knight Atrapos
    2x Beast of Nurgle
    2×3 Nurglings

    DG (Mortarion’s Hammer):
    Lord of Contagion w/ Shriekworm Familiar
    Lord of Contagion
    Lord of Virulence w/ Tendrilous Emissions
    2×3 Deathshroud
    2×10 poxwalkers
    Chaos Spawn
    3x Foetid Bloat-Drone w/ Heavy Blight Launcher
    3x Myphitic Blight-Hauler
    3x Plagueburst Crawler

    It is a rite of passage for every knight player to field a tyrant (or whatever the loser IK version is called) and remember in real time that this unit is not good.

    However, some of us are dense, and need to be reminded of that multiple times. I am that person.

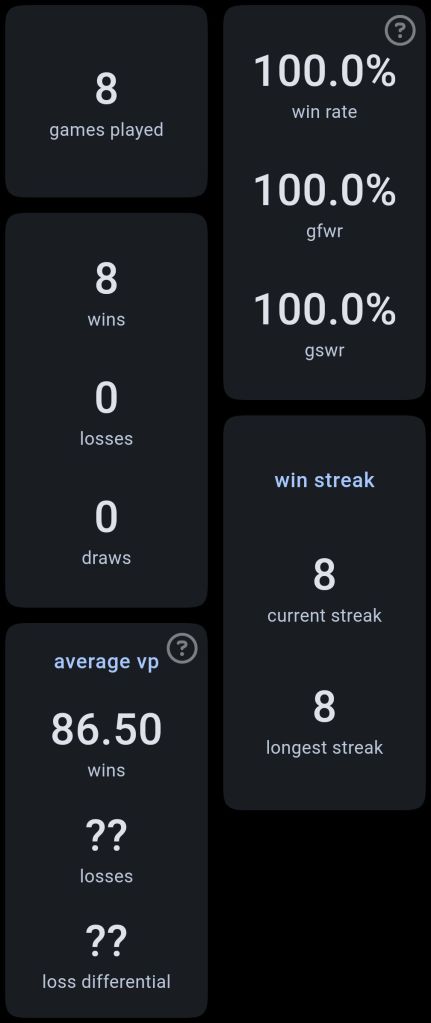
    Has the tyrant failed me bitterly in the past? Yes. Have I taken 3 to an RTT before? Also yes.

    My friend Steve, a very good DG player with a GT win under his belt, agreed to be my guinea pig for my hypothesis that deathshroud are annoying, and I want to have a bubble that says stop being annoying. Also, Infernal Lance means the normal slow tyrant is fast as hell. 11″ + assault means it can grab real sightlines without having to spend a turn trudging into place.

    The list eschews melee almost entirely and elects to instead shoot the fuck out of you. The despoilers provide extreme consistency while the tyrant threatens to kill multiple things in an activation (it won’t, but your opponent can’t just play around it not doing damage).

    Meanwhile, the DG list is The List. It shoots so so hard and the deathshroud bricks can beat the crap out of you in melee (mostly the LoC but the terminators are no slouches).

    The Mission and Initial Gameplan

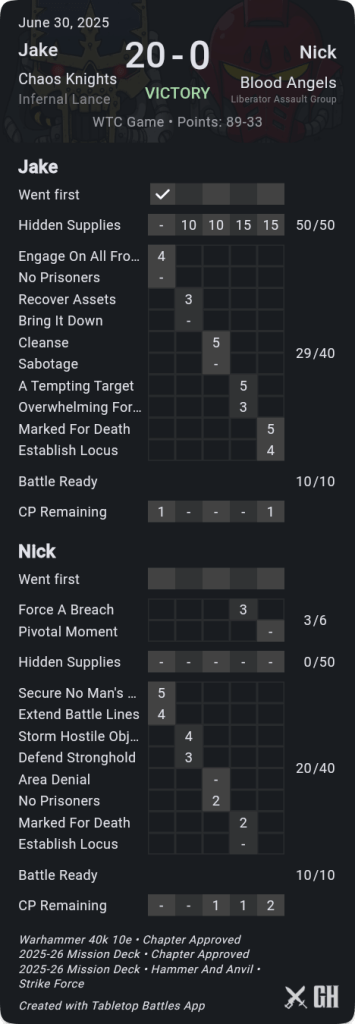
    Him and I have played this matchup two times before, so I had a decent idea of how to play into it and think CK is favored, though it’s not by much and the game is tough. We draw Scorched Earth on Crucible of Battle on GW layout 3.

    Neither of us have actually played on layout 3 in months. It’s a strange layout and isn’t normally in tournament packs. Your deployment is actually very well protected but everything in the center is visible from either diagonal. If you’re on an objective, you can see every other objective.

    The general idea for the tyrant to go towards my natural expansion and screen that entire quarter of the battlefield from deathshroud while the rest of my knights sit and wait for him to make the first move. I was relying on the beasts of nurgle and tyrant to force him to expose stuff and then pick that up. Because it’s t12, the tyrant was a lot more annoying for him to kill than the other knights, and if it died it would take basically an entire turn from him, and then I could go in for the kill.
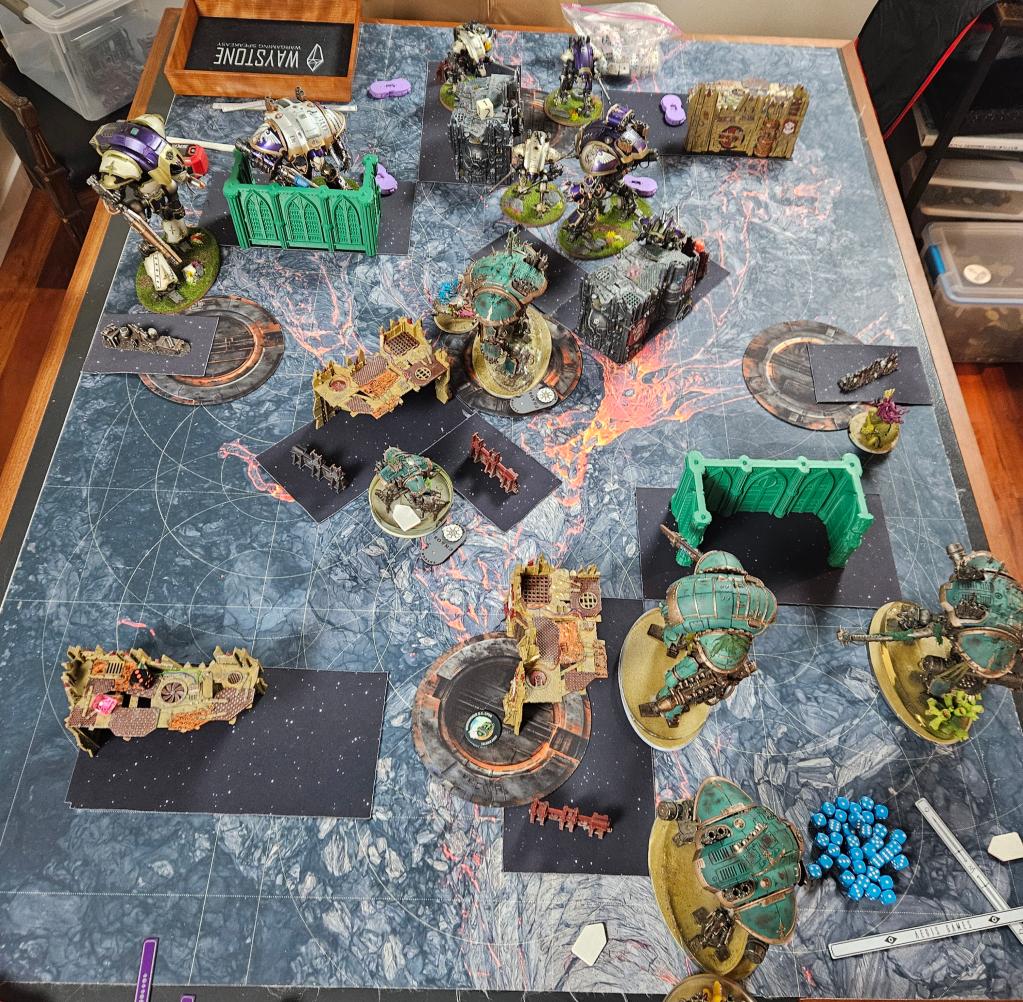
    Deployment

    I elected to put on of my despoilers in the sky because I was planning on playing a passive game and I was worried there wasn’t room in my deployment to safely put 5 big bases. He put both deathshroud in the air and everything else on the field. The Beasts were placed to go after the side objectives because I knew contesting the center was a deathtrap, while the nurglings screened his poxwalkers from dropping wherever he wanted.

    I ended up going 2nd, a massive advantage on scorched earth. Now I know that it’s up to him to make plays so my goal is just to make that as difficult as possible. He selected the -1 to hit affliction, and I selected -1 to hit outside of 18″ for my rule.

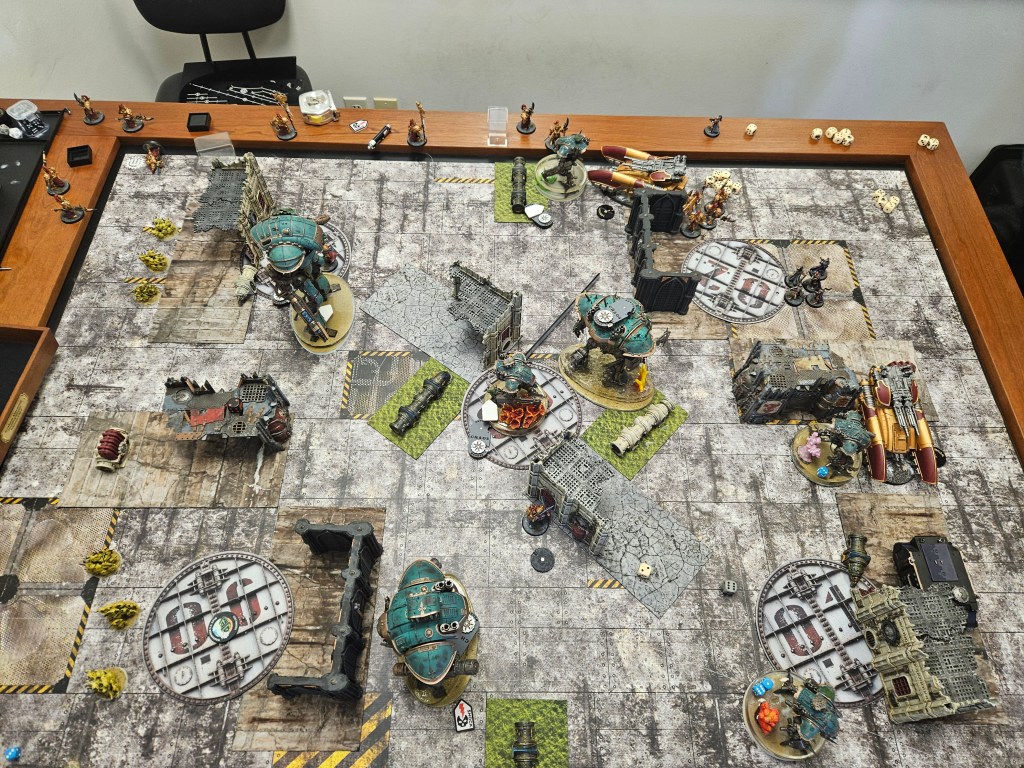
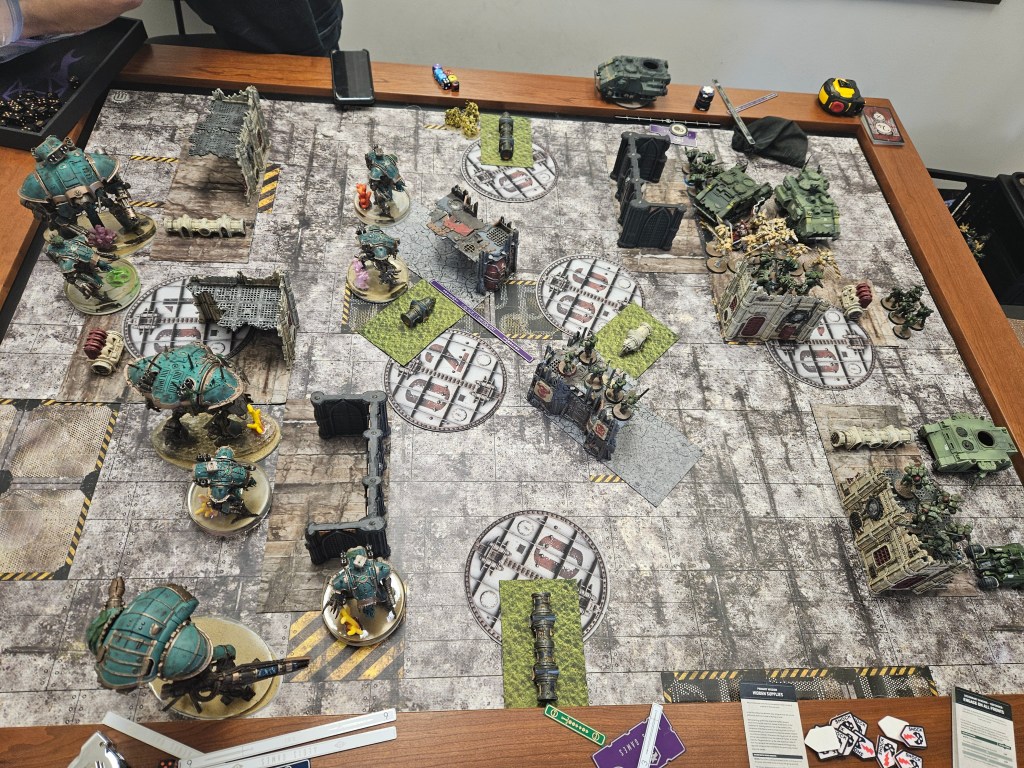
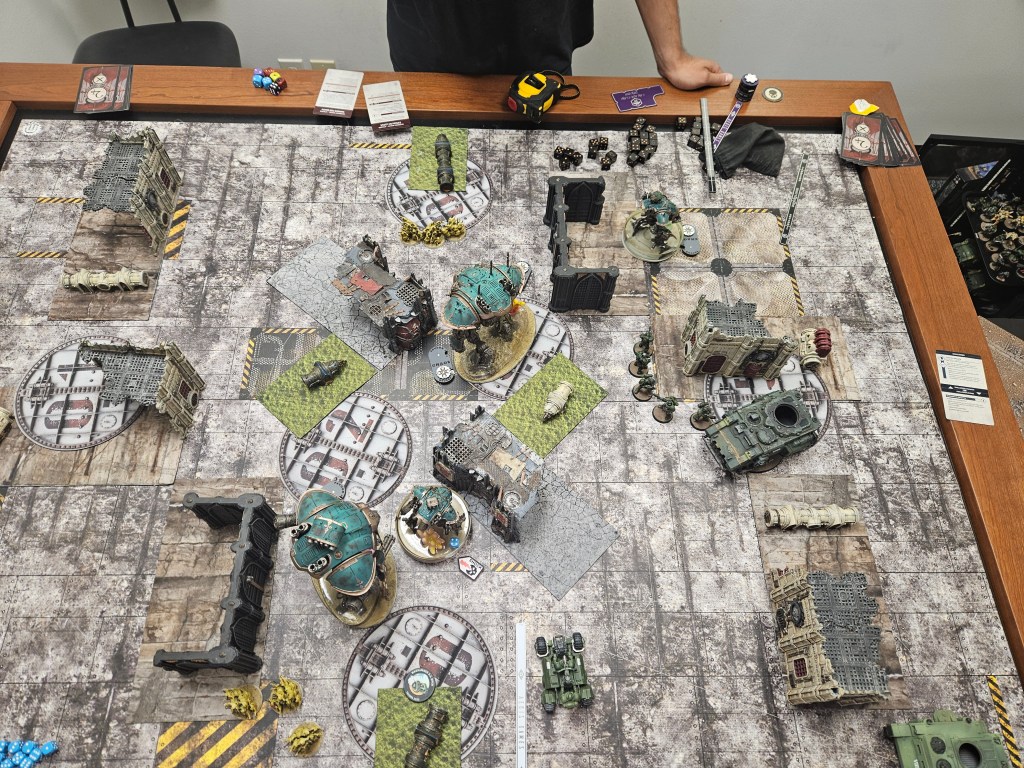
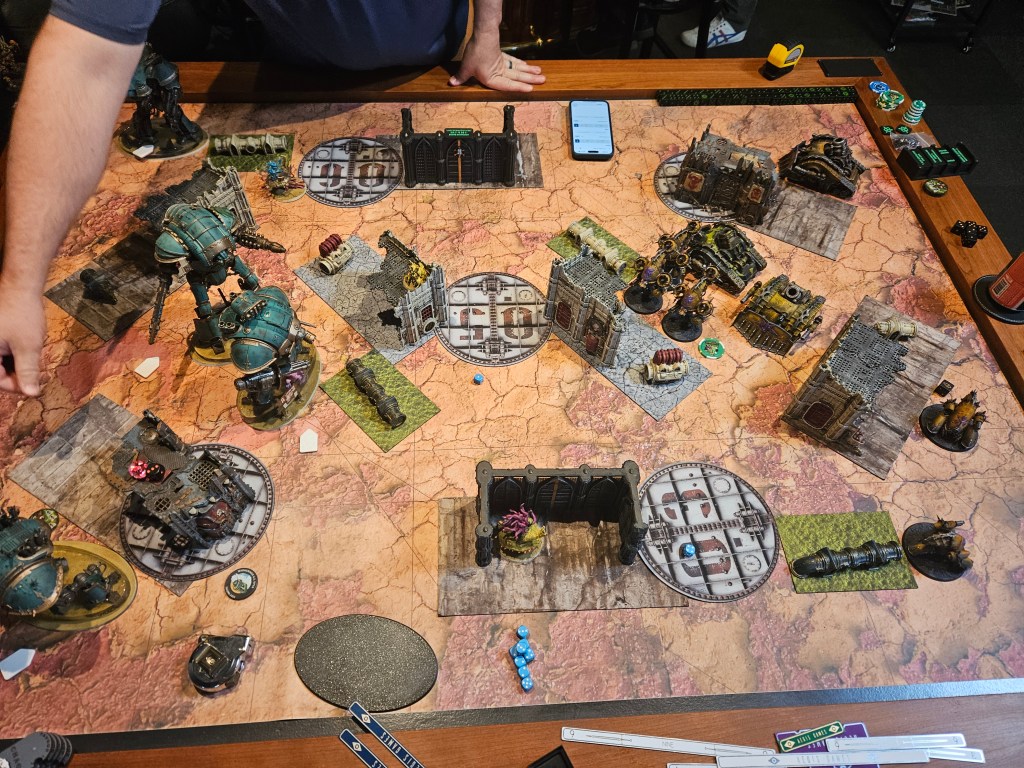
    After deployment and scouts, the battlefield looked like this (the poxwalkers are in the top center ruin and also the ruin the two blight haulers are hiding behind bottom right):

    Round 1

    He draws Bring it Down and Recover Assets. I am thrilled because the only way he can’t get a bead on any of my knights with multiple models, and his Lord of Virulence is tucked inside his home ruin so he can’t give full rerolls to stuff. I am totally safe and he just positions some stuff closer to the center for next turn and blasts the nurglings off the board with PBCs.

    My turn I draw and discard cull the horde, then draw Marked for Death and Cleanse. I sticky my home and scoot out of sightlines while the Tyrant books it up north, making sure to be out of charge range of the poxwalkers.

    Unfortunately, I can’t get my bottom beast onto the objective because his butt is too fat, so I can only score one cleanse. I pitch Marked for Death for CP and pass the turn.

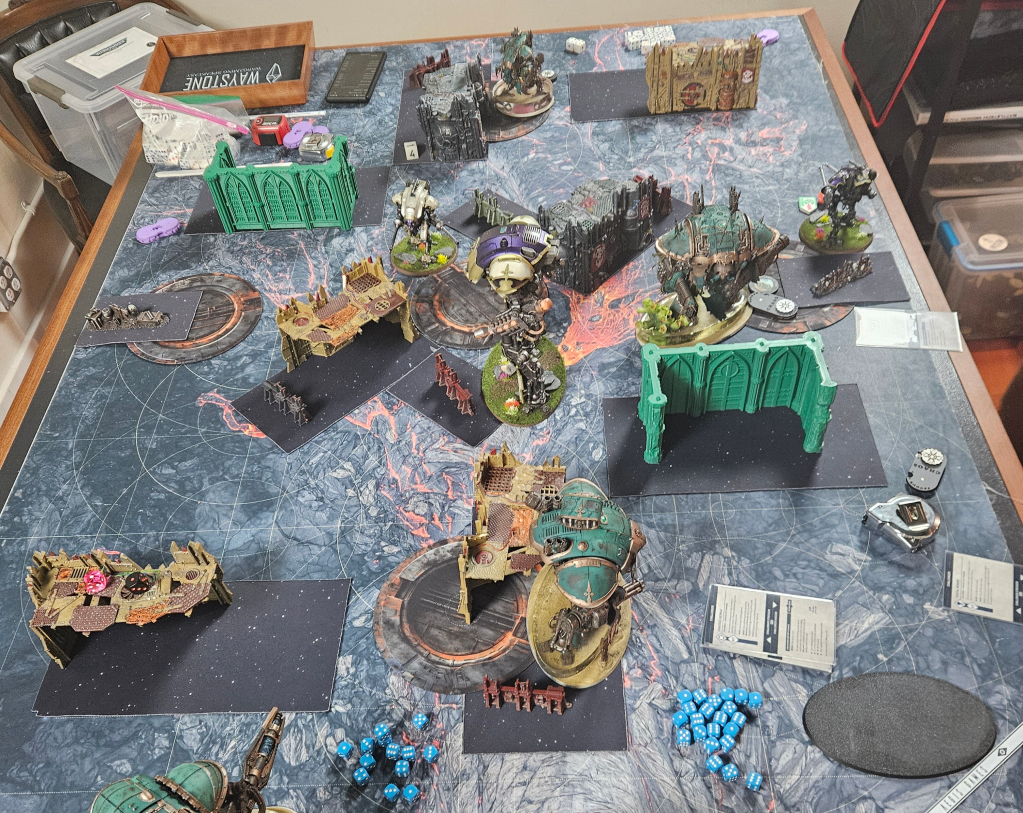
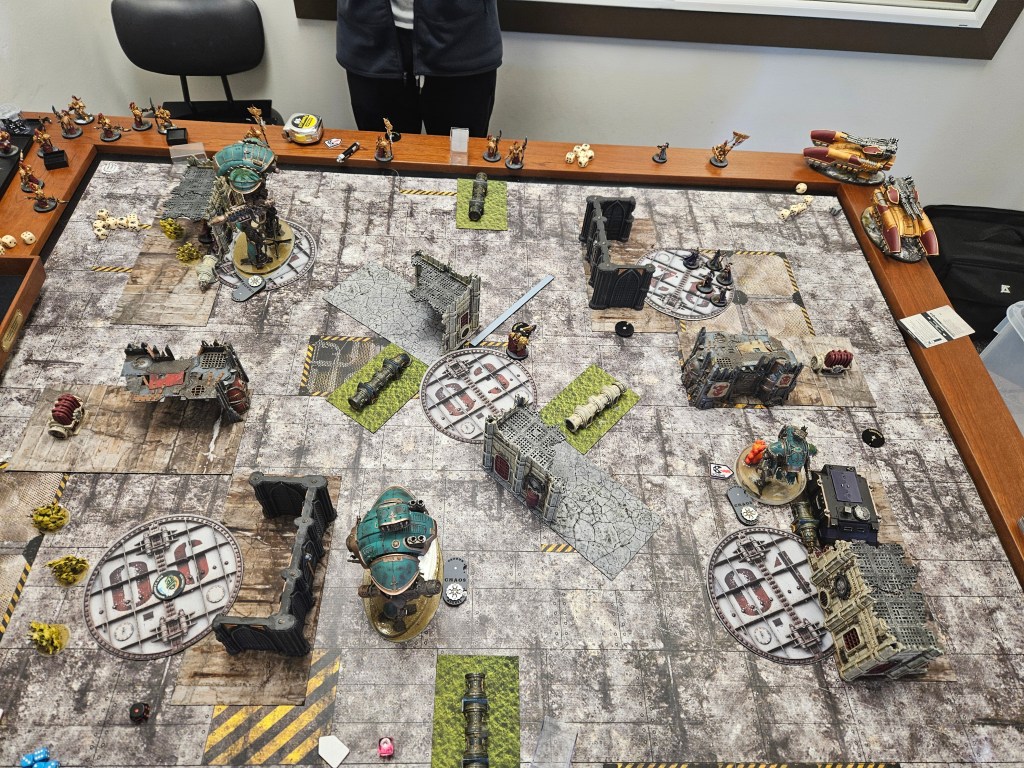
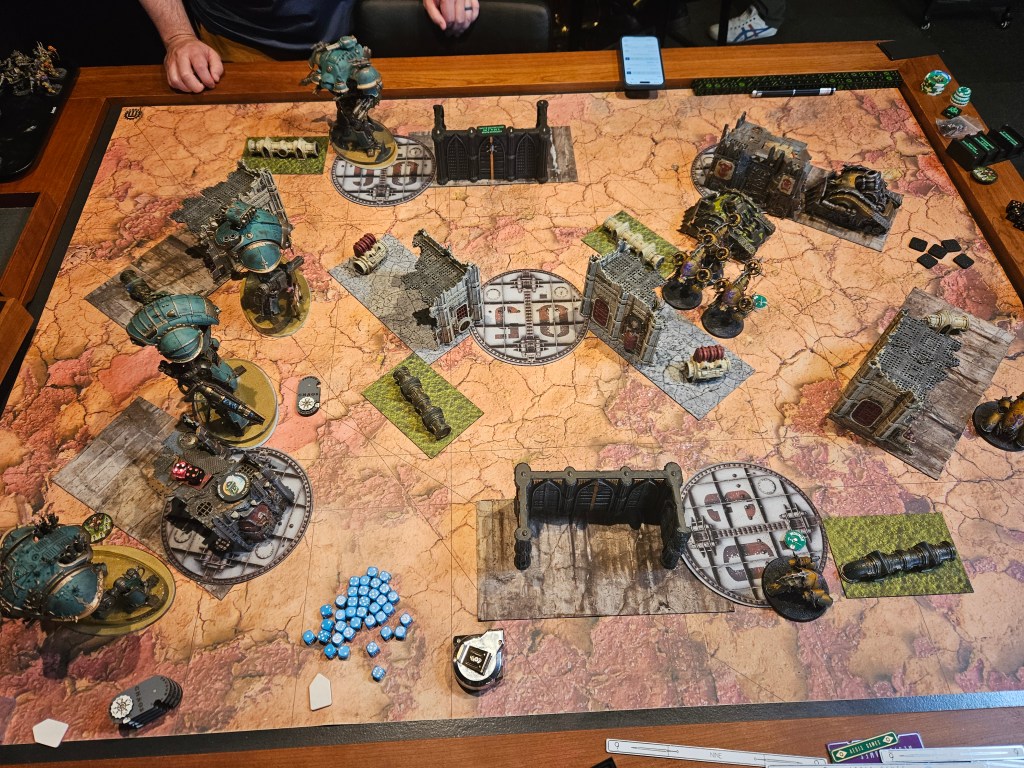
    At the end of our extremely boring round 1, the score is 13(opp)-12(me), and the board looks like this:

    Round 2:

    He scores 5 primary and draws Assassination and Establish Locus. He decides (correctly) not to go for any of the bigs and redraws assassination into Tempting Target. I select the top objective for Tempting Target so he’s forced to show his poxwalkers.

    He also puts his stinky aura on my tyrant because he can’t let it hit on 3s. This was part of why I wanted the tyrant, because he has to try and debuff the tyrant but can’t utilize the affliction to deepstrike stuff.

    He moves a blight-hauler and pbc onto the bottom point to force me to come out and deal with some things because he correctly identifies that the pbcs are the disposable units in this matchup since they’re less lethal than the bloat-drones and harder to kill. He also needs to kill the beasts and wanted redundant shooting into them. Because he exposed multiple things to deal with the beasts, they obviously fail every save and die to the first activation.

    The spawn press the locus button in the center and it’s over to me.

    I draw Defend Stronghold and Sabotage.

    Rant time! So, challenger cards are a bad game mechanic. You don’t need to be a game designer to understand this (I happen to also be a game designer so I understand it on a cooler and deeper level). In simple terms, anything that makes you consider not scoring points in the points-scoring game is a bad mechanic, and it also gives an absurd advantage to the person going 2nd. The person going 2nd knows exactly how many points they need to score to ensure they get a card and more chances to get one.

    I say all of this now because drawing two secondaries that score at the end of my opponents turn means that even though I am scoring them and gaining points, the brain-genius challenger card system sees I am currently down points at the start of the round, so obviously I am losing and desperately need the 3 free points a challenger card comes with.

    Now I am functionally ahead in points and still he has to make things happen because bottom of turn on scorched earth represents so many points he has to be massively ahead in round 5 to get a win.

    Anyways, I elect to not score sabotage because I want the CP and I’ll get the 3 points from the challenger card. This also means I don’t have to toe onto any terrain and expose myself. I think in retrospect I should have sabotaged with the tyrant by touching the pipe behind him but instead tried to advance and get a cheeky angle. I ended up only rolling a 1 on the advance and needed a 2 to toe into the terrain.

    This is a reminder to think out your whole movement phase before just moving shit, and just because you can advance, doesn’t mean you have to. That was 3 points I gave up by just being overly hasty.

    A despoiler sends the poxwalker brick up top to goopy heaven and the tyrant decides to flex a bit. I put the volcano lance and missiles into the pbc on the bottom objective, and the plasma into the blight-hauler also on the bottom. I drop the blight-hauler to 1 wound, one-shot the pbc.

    I touch the Atrapos onto my home even though it’s stickied because I cannot allow the deathshroud to just walk on and steal it, and need to screen the 6″ around the puck.

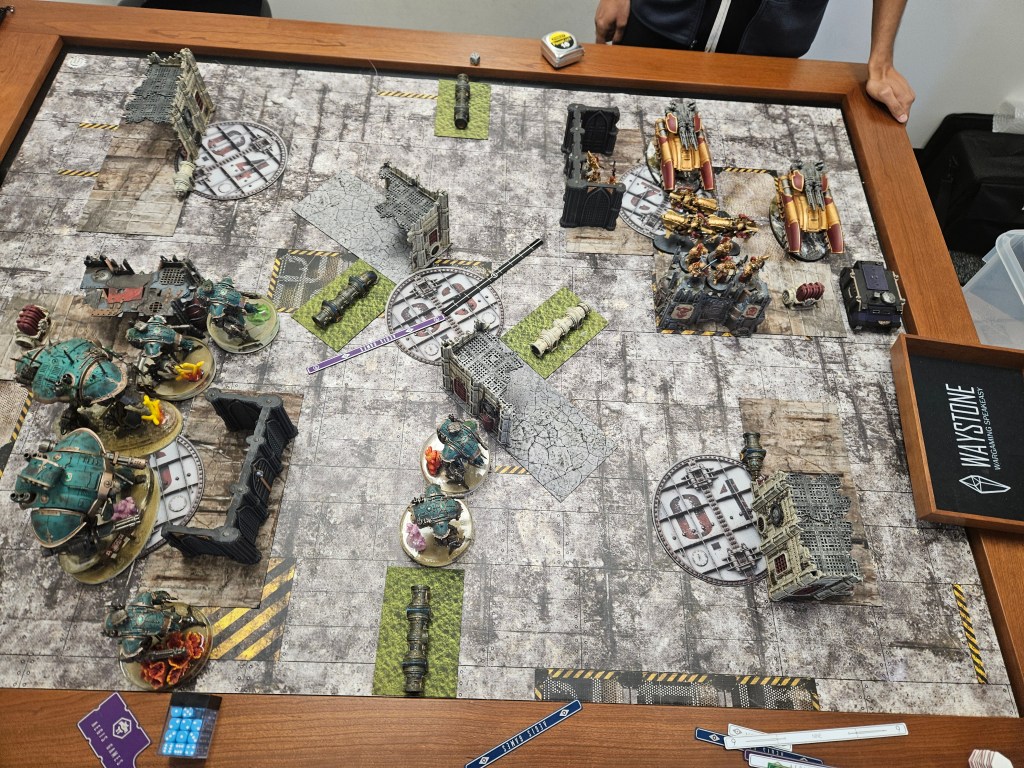
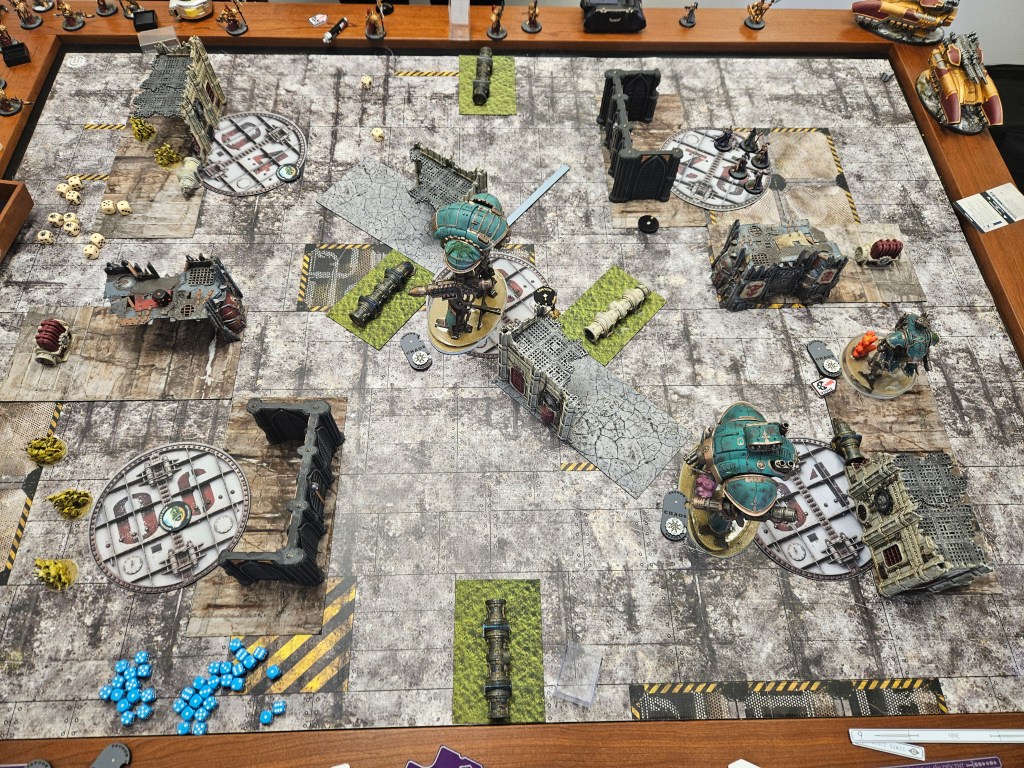
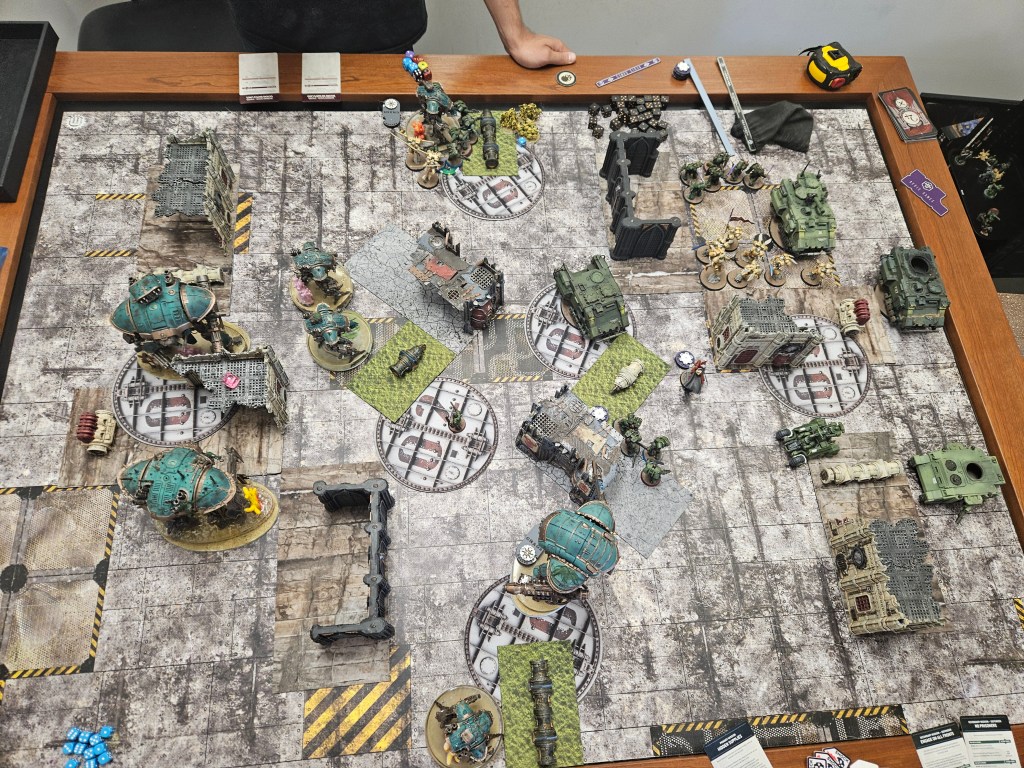
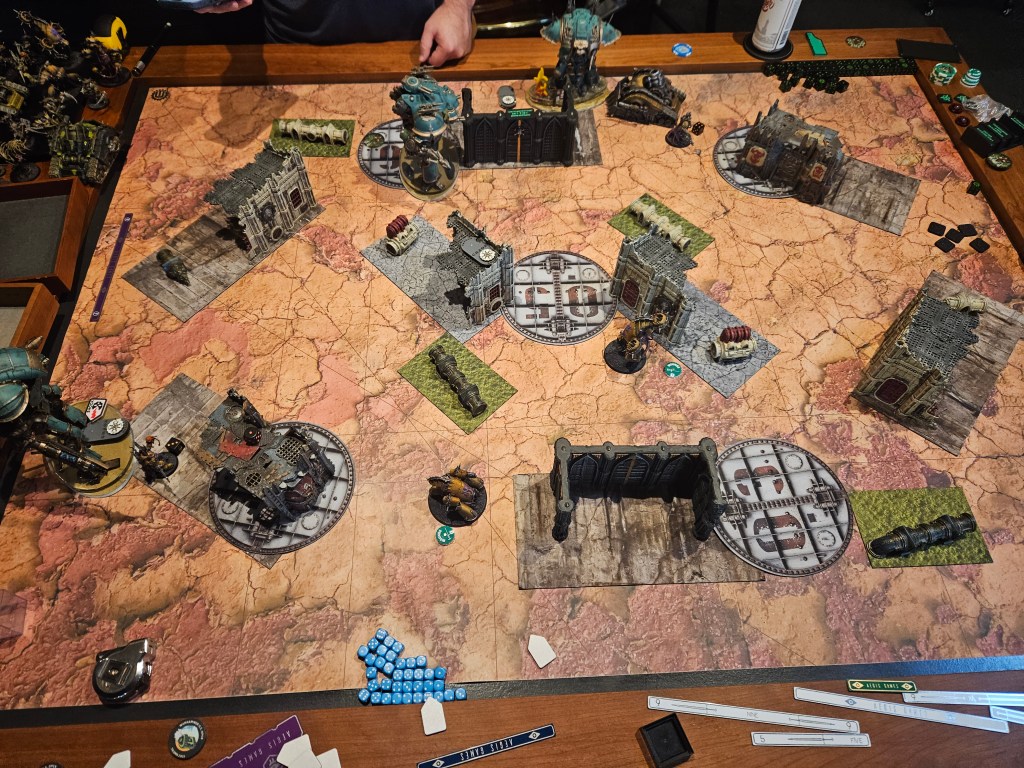
    At the end of the round, the score is 25-17 (though functionally 25-20 since it’s extremely unlikely he takes my home), and the board looks like this:

    Round 3

    I roll for my round of buffs and get +3″ aura (literally useless) and +1 to wound BS units.

    Unfortunately, now he has to bring in his deathshroud and he really does not want to. I’m set up to instantly turn them to dust and the places they can drop effectively are very small. He has to plop the affliction tokens on the two knights next to my home to be able to come in there, freeing up the tyrant to hit on 3s again. He insane braveries his blight-hauler on the bottom objective, scores 10, and also draws marked for death and defend stronghold. He pitches Marked for Death because he doesn’t think he can kill a big and pulls Storm Hostile Objective.

    Just a note because it may be hard to see in the images, but the tyrant is positioned behind the obscuring terrain in a way where he has to fully expose his army to get enough shots into it to threaten it.

    He moves his poxwalkers to screen all of his lower deployment and the other blight-haulers/pbc screen everything else. his Deathshroud drop in near my home, going after the despoiler at the bottom. Meanwhile, I ingress my other despoiler right next to the tyrant. He ends up having to toe into the building and be seen, but the angle is sharp enough that only the pbcs and one bloat-drone can see.

    He pops his reroll blast strat and his lord of virulence points at the newly emerged despoiler. Even through the diabolic bulwark, he drops it to 11 wounds. Meanwhile, his terminators hit their charge and kill the despoiler. He bins Storm Hostile and passes to me.

    Time for the crack back. My idiot despoiler son who just came in and got rocked passes his battleshock but fails his empowerment and takes the 3 mortals to bracket himself before of course he does (I really needed the lethals and felt it was worth it). The Tyrant stickies the top objective and I draw Secure No Man’s Land and Storm Hostile. I also draw the Great Haste challenger card and score it by walking the despoiler like 4 inches to touch his deployment.

    The Atrapos goes on his deathshroud killing spree, a thing he is exceedingly good at with his flat 4 damage. He kills 2 deathshroud in shooting in one squad and preps to charge the other. Meanwhile the tyrant pops sustained and rolls 3 6s on his volcano cannon into a bloat-drone, dealing a completely normal 43 damage to it and also killing another blight-hauler. The bracketed despoiler does his lethal hits thing and kills a pbc, while the other despoiler blasts through the wall to take the center and charges the spawn so they can’t do actions.

    Small aside: the battleshock walking through walls is not real. Never play around it. I have played 19 games with the new codex and have not failed the roll a single time. Yes, I’m aware I’m manifesting that I’ll fail it next time I play by saying this.

    The Atrapos charges the deathshroud and picks up two.

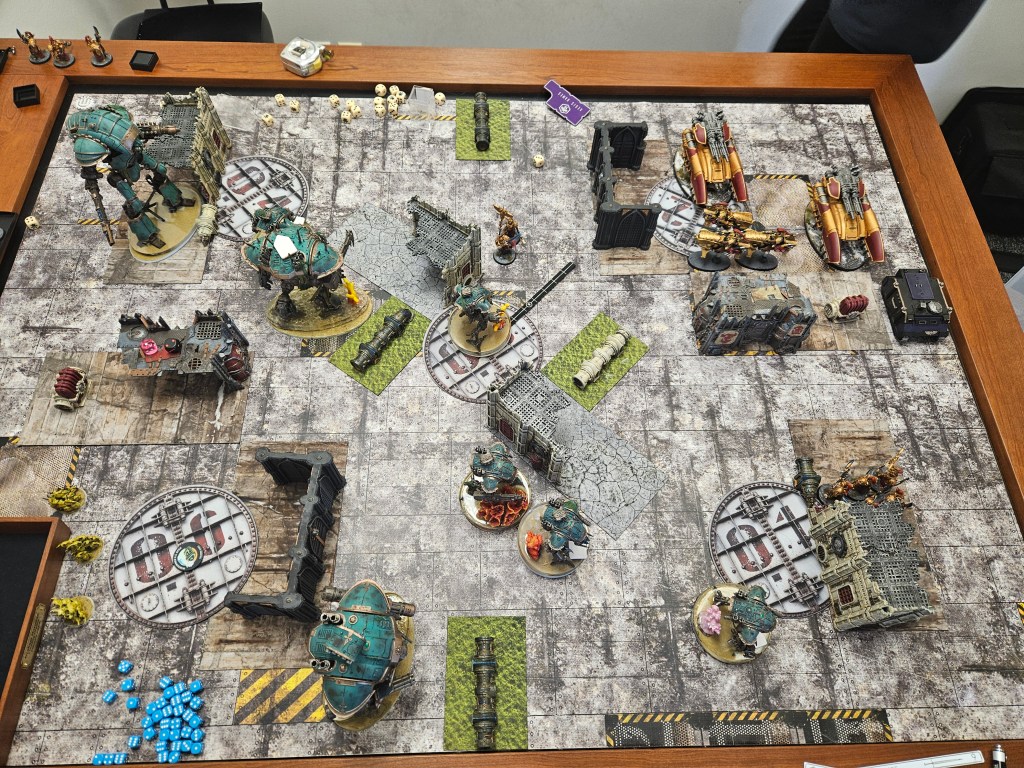
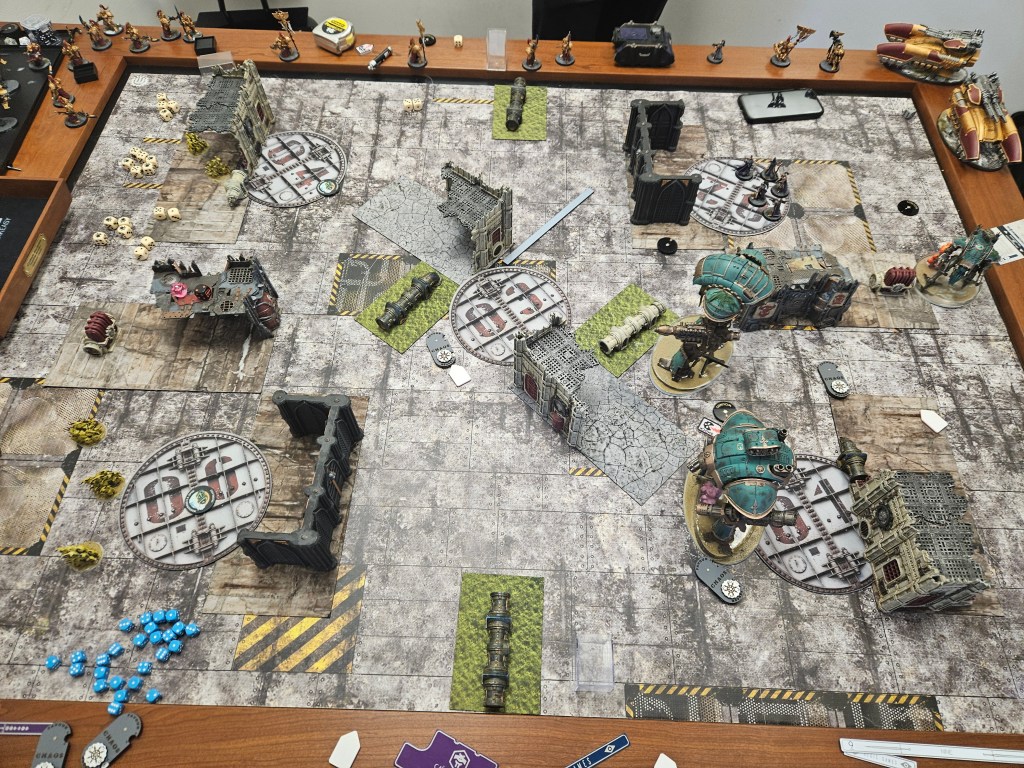
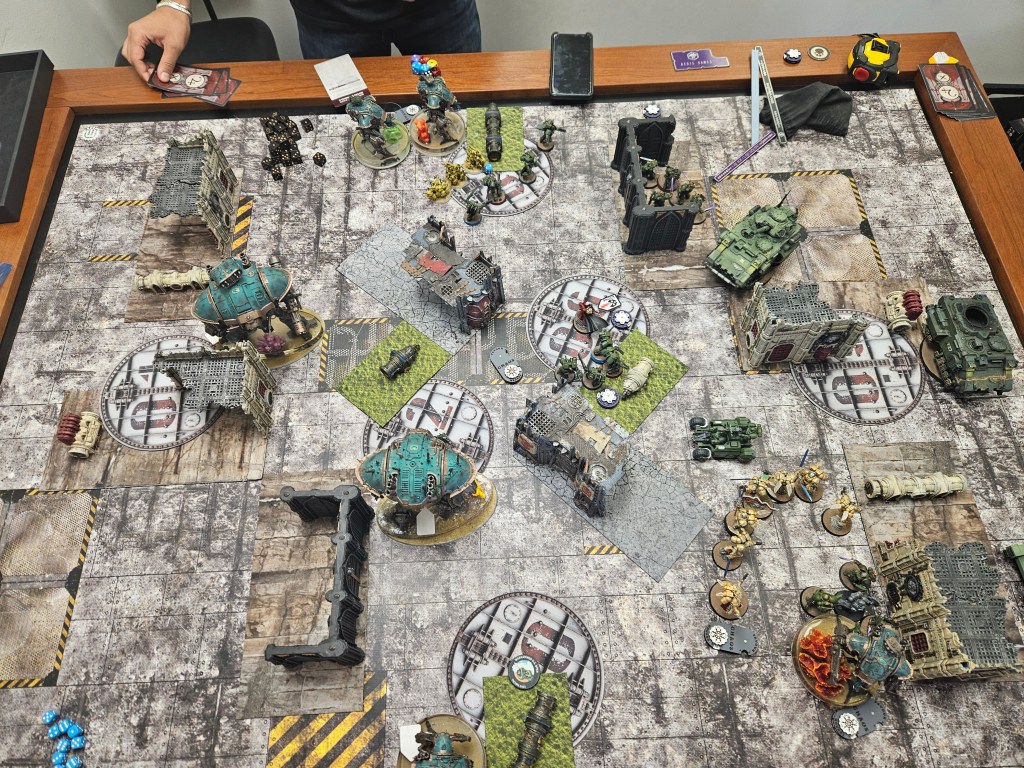
    The score at the end of the round is 38-42 and the board looks like this:

    Round 4

    He manages to pass all of his battleshocks (boo) and draws Engage on All Fronts and Secure No Man’s Land. At this point it’s still touch and go but I feel pretty firmly in the driver’s seat. He needs basically every activation to go right to be in the game on round 5.

    He decides to go for the Despoiler in the center to snag Secure while his poxwalkers get on the bottom objective, while allocating a couple things toward the despoiler up top. At this point the tyrant is just gonna be around because he lacks the output to kill it. Mission Accomplished. His deathshroud that aren’t engaged touch my home to remove the sticky and prepare to charge

    The Despoiler does die to the two bloat-drones and His Deathshroud get the Atrapos to 10 wounds but his blight-hauler whiffs and the pbc whiffs into the despoiler up north. The Atrapos gets it’s lick back and kills one of the deathshroud squads and the lord.

    On my turn, I draw Recover Assets and Tempting Target. The Atrapos fails his battleshock which sucks because it means I can’t do Recover, and he obviously selects the bottom objective for Tempting Target, which is impossible for me to get to.

    In a way this is fine, because it means I’m not giving up a Challenger card, and going into the final turn we’ll be roughly even, which means I’m winning as the second player. At this point, my only priority is to blank his primary. This means I have to kill the poxwalkers at the bottom and the bloat drone and chaos spawn in the center. Anything else I kill is gravy.

    The despoiler up top blasts down to the poxwalkers and picks them up, while the tyrant positions itself to be able to touch the middle next turn and kill the stuff on it, which it does with ease. The Atrapos shoot the Lord of Contagion he already killed and kills it again for real this time. I charge the PBC just to keep its blast from targeting the despoiler and the atrapos kills the other lord of the contagion in melee. I have now killed 3 lords of contagion this game and there is still 1 alive. Totally fine datasheet.

    At the end of the round I score nothing and pitch both. The score is 50-47 and the board looks like this:

    Round 5

    I pick force battleshock below starting and only the wounded lord of contagion fails, but primary is still denied. He draws Extend Battle Lines and Overwhelming Force. He bins Overwhelming since he can’t flip any objectives and then draws into No Prisoners. Both the Despoiler and Atrapos are under 4 wounds so not a bad draw, but he has to fall back the pbc and only has the bloat-drone and blight hauler that can really do much.

    His blight hauler whiffs but the lord of contagion finishes the job and the bloat drone whiffs on the despoiler.

    On my turn, I draw Extend Battle Lines and Engage on All Fronts. Immediately I pitch Engage and draw Area Denial. The rest of the game is on rails as the tyrant burns the center and I kill the bloat-drone next to the tyrant.

    At the end of the game, the score was 56-69 in my favor and the board looked like this:

    Takeaways

    The Tyrant was…good? I think I’d need another game or two with it to really be sure, but it was intended to give Death Guard a hard time and it certainly did. Would it have been better if it was a second Atrapos or just a bunch of war dogs? Hard to say. The -1 to hit really hurts it, but it still is something your opponent has to respect. Any DG players reading this, your takeaway should be that the -1 to hit affliction is the one to go with against knights. Hitting on 4s is really rough, especially on the war dogs. The name of the game against DG is to 1) kill the bloat drones and 2) deal with the lord of virulence. That character with the enhancement is fucked up. Almost doubles the output of the army into a target.

    Aside from that, I think the way to handle Mortarion’s Hammer is to drip feed them chaff and when you expose something valuable, expose everything. They’re really good at killing one thing, but struggle to get efficient shooting into multiple targets. Also tagging stuff is massive since almost all of their damage is blast.

    That’s all for me for now. I have a battle report against Eldar in the works and aside from that I’m waiting for the inevitable nerfs for knights of all flavors and DG (and hopefully challenger cards get removed from the game please gw I beg).

  • The Lists

    CK:
    2x Despoiler (Double Gatling) – One is the Warlord
    Atrapos
    Rampager
    3x Karnivores
    2x Beasts of Nurgle
    2×3 Nurglings

    IK:
    Canis Rex
    Atrapos
    Knight Errant
    Knight Paladin W/ Unyielding Paragon
    4 Helverins

    This Infernal Lance list was making the rounds after going 7-0 in a tournament and I wanted to give it a shot. The real thing I appreciate about this list is that it uses daemons to apply early pressure instead of Stalkers so it can handle opponents taking fixed much better. If my opponent takes fixed (Bring it Down/Assassinate specifically) I can play ultra passively and out-score them with tactical, forcing them to come out and kill chaff and then counterpunching them.

    Also god damn does this list shoot. 72 lethal or sustained gatling shots going downrange is anti-everything.

    The Mission and Initial Gameplan

    We rolled a classic mission: Take and Hold on Hammer and Anvil on GW layout 1. This was my first time playing against IK with our codex and this game was mostly testing some hypotheses. We both went fixed (Bring it Down/Assassinate). I was pretty sure I was slightly favored because of the melee invuln and my shooting was more consistent. However, Canis Rex is some bullshit so it was possible I would just get owned and that would be that. We both recognized that whoever went second had a huge advantage in this match, but I was better equipped to mitigate going first.

    Deployment

    I reserve a Karnivore and my opponent puts it all on the field. I briefly thought about reserving nurglings until I realized that their -1 to hit doesn’t affect titanic units and since I was taking fixed they wouldn’t be scoring points. I decided to deploy them in the center hiding so I could use them to body block and be annoying. (Also the Blue Scribes is a Beast of Nurgle proxy because I left him at home whoops).

    Our deployments were very similar (shocking, I know). I knew my melee was more threatening so I positioned the Karnivores to 1) be near their Dad (the rampager) to get rerolls and also force him to play back a bit to not get immediately slammed. I put the Rampager so he could hide in the designated Rampager zone (the little cubby layout 1 gives you) and he answered by putting his Errant in a similar place.

    I ended up going second and selecting Darkness for our army rule (-1 to hit). The board looked like this at the start of the game:

    Round 1

    My opponent realizes that exposing knights first is a great way to instantly lose one so his first turn is very passive. He simply shuffles some of them into better positions to counter-attack and brings the errant closer. No tactical means there’s no reason to get to parts of the board or do actions, so this game is purely about positioning. It’s also really important to bank a ton of CP, even more so for him with his fight on death strat.

    My first turn is slightly more interesting. I sticky my home and get the rampager up to where he needs to be. The nurglings on the right side advance and position themselves so the Errant can’t get a good position without exposing itself to my entire army. The other nurglings charge out into the center to block him from just running out there and are positioned so in order to get free shots on them with the helverins, he has to bring them into a possible sightline.

    Finally, one Karnivore touches the right objective. It can be shot from across the board, but getting that line means putting something into Rampager range. The Beasts hang back, ready to touch objectives next turn if they have to.

    At the end of Round 1, the score is 10-10 and the board looks like this:

    Round 2

    My opponent understands that he needs to make something happen or he’s just going to lose the primary game because I don’t need to actually engage him to win. He brings the Warden out to play, hoping with the AoC enhancement he can soak shooting and then counter-punch. He does pick up the Karnivore with battle cannon shooting and also kills the nurglings.

    Now I have to respond or he goes ahead in scoring. I position all my shooting knights so I can blast into the Warden and also be out of the Errants melta range. My warlord goes alllllllllll the way in the back because losing him and giving my opponent’s army a 5+++ is my loss condition. The Beasts come out because I know he needs to focus on the big boys and won’t be able to easily deal with them standing on points.

    I try to get cheeky here and recognize my opponent desperately wants to fight on death, so I use Unleash Balefire for the first time ever. For people who don’t know what that stratagem does, it’s not your fault. It forces a battleshock after a unit shoots a target, and since my rampager is standing just outside engagement range, it’s at -1. Him failing that would have been massive but as is tradition, battleshocks are bad to rely on and he passes.

    But he was really worried for like two seconds there.

    He gives the warden a 4++ in shooting and I split a bit after shooting it down to 11 wounds, also chipping a helverin to below half.

    I charge the warden and the Rampager reminds me to never actually rely on him, rolling 3 1s to hit and then only wounding twice. I cannot allow the warden to live, so I CP reroll a failed wound.

    Pro Gamer Tip incoming: Don’t CP reroll. It’s almost never worth it compared to having CP to do actual strats later in the game. If you’re a newer player and are struggling to win games, my first advice is always to treat CP reroll like it doesn’t exist. It’s an absolute last resort because CP economy is so important in this army, doubly so when you aren’t getting CP from binning secondaries.

    However, sometimes you gotta.

    Anyways, I reroll a failed wound into a devastating wound because this game is easy, delivering 8 mortals directly to the Warden’s forehead. My opponent pops fight on death but only succeeds on getting one wound through because IK knights are so much worse at melee (yes Canis exists shut up). 8 damage is a small price to pay for killing a big.

    Also, the warden explodes and deals 1 mortal to the rampager and 4 to his armiger and errant.

    At the end of the round, the score is 25-17 and the board looks like this:

    Round 3

    I select units roll Battleshock below starting strength for my army rule since now I am suddenly near two wounded things thanks to my good friend the exploding warden. The Errant fails the test (huge) and the helverin is fine.

    He sends the Atrapos after the Karnivore in the cubby so he can pressure my warlord while Canis and the Errant head toward the center.

    Astute readers may have noticed there is a beautiful ingress point in the top right corner of the board. Good eye, you are so smart and beautiful. I slam my Karnivore behind the ruin so only one helverin can see it and prepare to attack his home. The Errant meltas the hell out of my rampager and canis chips the non-warlord despoiler down a bit.

    The Atrapos charges and uses the renewed focus challenger card to reroll 1s to hit and wound into the Karnivore. I pop the defensive empowerment in hopes of scamming my opponent but it doesn’t pan out.

    Coming into my turn, all of his bigs are exposed, so it’s time to make sure they don’t see the next round. I decide that the atrapos is less of a concern and focus on making Canis and the Errant very dead.

    My Atrapos heads to the center so he can charge whichever knight survives my shooting phase. My first Despoiler moves out and touches the rightmost objective to deny it and rolls like an absolute psychopath, handing Canis 15 saves. Canis lives but is barely alive. This is why we bring two Despoilers, because the second one finishes the job and puts a bit more damage on the Errant.

    Aside #2: This matchup is hard. Both of us felt like our brains were boiling from the cognitive load. I bring this up now because we both totally forget Ser Hektur is a thing and don’t put him down. I don’t think this change anything regarding the results of the game but was a definite oopsies. The Atrapos brings the Errant to 3 wounds.

    Charge time. Atrapos into Errant, Karnivore into one of the Helverins on his back objective, tank shocking to make damn sure it dies. The Errant dies and my Atrapos consolidates in a way where his Atrapos can’t easily charge it. My Karnivore obliterates the helverin and consolidates into the other Helverin.

    At the end of the round, the score is 52-39 and the board looks like this:

    Round 4

    His Helverin on the right objective fails its Battleshock and he moves his Atrapos to touch my home and remove the sticky, then prepares to charge my atrapos. He draws the Pivotal Moment challenger card, which allows his Helverin at home to fall back and shoot (deeply annoying). He puts the helverins into the Karnivore, but it lives on 2 wounds.

    His Atrapos connects with mine and kills it.

    At this point the game moves pretty rapidly. I Insane Bravery my Karnivore, move my Despoiler to retake my home while my other Despoiler stickies the point he’s on just in case and then kills one of his Helverins. My Karnivore doesn’t move so he can’t overwatch it to death.

    At the end of round 4, the score is 57-49 and the board looks like this:

    Round 5

    I select an additional -1 to LD for my final blessing and my opponent fails his battleshock on his Helverin again and we realize we can effectively talk out the rest of the game. It’s just a case of if he manages to kill anything else. He puts both Helverins into my Karnivore, who decides he will simply make his saves and take 0 damage. The Atrapos then bounces off the Despoiler.

    I’ve already maxed Bring it Down, so I just have to see if I can kill the Atrapos. My Karnivore gets scared because he’s all alone, so that costs me 5 Primary points but I can’t be mad at his performance. I fail to kill the Atrapos and that’s the game.

    At this point, it’s 9:30pm and my brain is so fried I forget to take a picture, but since nothing actually died between round 4 and the game ending it’s…the same picture.

    The final score is 67-54 in my favor.

    Takeaways

    My opponent was still tinkering with his list when we played, and afterwards we came to the conclusion that 1) he really wants sticky in his list, and 2) the Errant isn’t where he wants to be. I think that if I played this again, I’d probably take tactical, but Infernal Lance has all the tools it needs to go toe-to-toe in the knight fight.

    Ultimately, I believe it’s a small win for whoever goes 2nd, but we can do better going first than they can because aside from Canis we outdamage them and outspeed them. I still think Infernal is better in the mirror than Lords of Dread because as good as Titanic Duel is, an invuln in melee is just so good in the mirror.

    Also this mirror sucks. One of the hardest games I’ve played and we got close to clocking out. If I had to play this multiple times in a day, or at the end of a GT, it would be brutal on my brain.

    Thanks for reading! I have battle reports against Eldar and Death Guard on the way, as well as a game where I bring a Tyrant.

    Is the Tyrant going to be more than an expensive paperweight? Maybe! Subscribe to find out.

  • CK:
    Chaos Cerastus Knight Atrapos
    Knight Despoiler W/ Bestial Aspect
    Knight Rampager W/ Fleshmetal Fusion
    3x War Dog Karnivore (Havoc)
    3x War Dog Stalker (Melta/Claw/Havoc)
    2×3 Nurglings

    Custodes:
    Blade Champion W/ Superior Creation
    Blade Champion
    Trajann Valoris
    Shield-Captain on Dawneagle Jetbike W/ Admonimortis
    Anathema Psykana Rhino
    2x Caladius Grav-Tank
    1×5 Wardens
    2×4 Wardens
    1×2 Vertus Praetors
    2×5 Persecutors

    For a breakdown of my infernal lance list: Click here

    The Mission and Initial Gameplan

    We drew Take and Hold on Search and Destroy on GW layout 1. I reserved one Karnivore as is tradition, and he put the smaller warden brick attached to Trajann into reserves. I knew that my win condition was stretching him to the breaking point because while he could absolutely kill me, he only had 6 units that could do so, one was up in the air, and most of the others were melee. The name of the game was to force him to pop the Warden FNPs before melee and to get him to expose the grav tanks without losing too much to them for free.

    Deployment

    My deployment was pretty simple. I put the stalkers up on the line to move into annoying places. I put all 3 bigs inside my L (the atrapos is positioned roughly where his rhino is but didn’t get into the picture). I did slightly mess up here and accidentally body-blocked my stalker up top because I was trying to bait a caladius to come into the center. I scouted my two stalkers into a position where neither caladius could draw a line to them and any warden charges would expose them to my guns. Deployment looked like this:

    Round 1

    I select +3″ to auras for my army rule (since he functionally ignores the -1 to hit and I really like giving the extra leadership boost to my dogs).

    My opponent went first and drew a truly awful combo of tempting target and cleanse. He and I both knew the second he put anything out it was gonna die with extreme prejudice and nothing was fast enough to touch a point and do an action. He ended up just advancing out two warden bricks and tried to hide them. The ones in the bottom ruin were an inch away from the wall and effectively immune to damage. The ones up top with the superior creation blade champ however…

    I draw cleanse and establish locus and decide it’s time to start killing golden boys. I sticky my home and start marching forward. The atrapos exposes himself to be able to both cleanse and shoot the wardens, while the despoiler draws line of sight down at the bottom. I sacrifice a stalker to cleanse at the bottom and decide to pitch establish locus because the two points it would score me would give him a challenger card, and that’s actively harmful. Also I know I need every possible CP next turn to threaten an interrupt.

    He popped the fnp on the wardens and still lost 3 bodies to the despoiler and atrapos. At this point the squad is effectively neutered. I positioned the Karnivore in the center to go in and finish the job instead of establishing locus and it decided to fail a 4″ charge twice. Oh well.

    At the end of the round, the score was 15-10 and the board looked like this:

    Round 2

    My opponent drew Display of Might and Bring it Down. At this point display is functionally impossible unless he pushes his entire army into the center (and then instantly loses most of it) so he decides to ignore that and claim BiD by doing what the caladius does best. He blasts the Despoiler for 14 damage and then the bike unit also exposes itself to exactsies the center Karnivore. He gets a unit of sisters out to cover his home and then brings the rhino and the other sisters over to the bottom objective.

    Since he now holds that, he decides to go after the two dogs hiding below the center objective. He gets a bit greedy here and goes for the multi-charge and ends up having to split his warden brick really awkwardly, with the blade champ and one warden going into the karnivore and the other 3 going into the stalker. I pop both empowerments and take minimal damage but don’t kill any of the wardens on the crackback. However, he did pop his fnp, which is huge for the despoiler directly in front of them.

    Up north, the wounded wardens charge the Karnivore hiding above the Rampager to try and grab some extra value from a doomed unit. The Karnivore shrugs and sends the unit to hell, letting the blade champ activate superior creation and get back up. This may seem like an error, but it forced me to keep the atrapos over there instead of slamming it into a caladius. Good value out of a squad that was functionally useless for damage.

    On my turn I draw Recover Assets and Defend Stronghold and my despoiler fails his battleshock (fair, I would too if I just randomly domed for half my wounds). I’m not in a position to recover so that will become an extra CP and defend is a done deal. The rampager runs forwards towards the bikes while the blooded Karnivore ran towards the caladius up top. The atrapos sighs and takes up position to deal with the annoying guy with two swords near him.

    The dogs engaged with the wardens bottomside fall back and sit on objectives, clearing the way for the despoiler to cast gun at the squad. I drop nurglings up top to stop him from dropping trajann there because that would be very very very very bad for my health. He actually ingresses them behind the upper caladius to get a heroic on my Karnivore. This is a great play but because of where the Karnivore is, he can’t quite secure the heroic and is relying on me getting a short charge so I can’t tag the far part of the caladius.

    Aside from the despoiler erasing wardens from the world and leaving the blade champ at 2, my shooting phase goes very poorly. The atrapos chips the caladius for 4 but everything else whiffs. It’s fine, this is why the chaos gods invented melee.

    I charge the rampager into the bikes so they can’t heroic the stalker who charges the lower caladius. The Karnivore up top gets an 11 and goes as far away from Trajann as he can, denying the heroic by millimeters. The atrapos shimmies over to the blade champ.

    The Rampager rolls 3 6s to wound and just erases the bikes no save. Everything else…doesn’t. The blade champ lives on 2, and both caladius live on single digits. But there’s good news. He now has 3 units that can actually kill units, and two of those are weakened.

    At the end of the round, the score is 28-19 and the board looks like this:

    Round 3

    For my army rule I select ‘units below half-strength that fail battleshock take d3 mortals’ because his blade champ is at 2 and his tanks are both below half. My opponent draws Overwhelming Force and Assassination and gets Burst of Speed for his challenger card. He uses Insane Bravery on the Caladius on 2 because he can’t risk it just dying. It’s go time.

    Trajann and his pals go rampager hunting, using burst of speed to make the charge guaranteed. The caladius decides it doesn’t want a Karnivore invading its personal space anymore and one-shots it. His Blade Champ up top falls back and hides in the terrain so that the Atrapos has to go deal with it.

    The Rampager falls to Trajann going sicko mode (he then re-ups moment shackle) and the wounded Blade Champ tries to take out the center Karnivore but it backfires and the Karnivore backhands it into the sun. The sisters rhino tank shocks the stalker to death in the bottom.

    On my turn I draw Overwhelming Force and Tempting Target. He selects the bottom objective for Tempting, which has way too much OC on it for me to contest. I ignore it and hope the Stalker can get the job done against a Caladius at 3 wounds.

    Despoiler goes brrrt and kills 4 wardens, leaving one and Trajann left. I decide it’s more important to kill the Caladius with the atrapos instead of moving him to charge the Blade Champ, so I wrap the Blade Champ with nurglings and the Atrapos so he can’t go anywhere annoying. The atrapos picks up the other Caladius and all that’s left is Trajann that can meaningfully harm me.

    I make a little oopsie here, going in with the Karnivore to kill Trajann forgetting he re-upped Moment Shackle. I tank shock the warden and with lethal and sustained hand him 10(!) saves. He uses the 2++ moment shackle and only fails one save, then kills the Karnivore on the crackback. Tragic.

    I decide to keep Tempting Target because nothing can stop me from touching it next turn and turning all the sisters there into salsa.

    At the end of the round, the score is 41-37 and the board looks like this:

    Round 4

    My opponent draws Area Denial and No Prisoners. This is exactly amazing for me because the only way he can score Area is by keeping Trajann there, and that means Trajann isn’t murdering something. It’s at this time that the Blade Champ decides he’s too scared and calls it quits, failing a battleshock and dying to the mortals.

    The rest of his turn goes very fast because he decides 5 points is too much to pass up, so trajann stays there and he shoots some bolters at a stalker to annoy it.

    I sticky the top objective with the Atrapos and then send it after Trajann while the Despoiler heads over to take the Tempting Target. Trajann dies to tank shock and the game is functionally over at this point.

    Oh also the Stalker finally kills the rhino it’s been fighting for two rounds. Please clap.

    At the end of round 4, the score is 61-57 and the board looks like this:

    Round 5

    My Opponent draws Extend Battle Lines and Storm Hostile Objectives. This may seem like it’s doomed since he only has two units of prosecutors left but my opponent plays to his outs and goes for bracketing the despoiler to flip that objective. A miracle bolter shot drops me to 9 wounds and scores him 8 points of secondary.

    On my turn I get Assassination and Sabotage. The Stalker limps over to his deployment and sabotages while the two knights return that one wound the sisters dealt with extreme prejudice.

    The final score is 87-70 and the board looks like this:

    Takeaways

    With our codex, this matchup went from legitimately unwinnable to (in my opinion) favored. While Caladius tanks are still absurd datasheets, they die fairly easily once they expose themselves. The warden bricks also struggle to kill a big fully, especially through AoC. It’s not possible for them to gang up on a knight because losing the +1 to wound hurts their output more than they gain from adding another unit of wardens to the fight. Plus you then get to actually interrupt.

    I think the real strength is having the threat of killing wardens in shooting and in fighting. Wardens thrive into monophase armies, but the fact a karnivore can feasibly pick up a unit of wardens if they whiff and don’t pop their fnp is huge.

    Thanks for reading! I have several more battle reports coming down the pipe for elves, death guard, and IK.

  • The Lists

    CK:

    Chaos Cerastus Knight Atrapos

    Knight Despoiler W/ Bestial Aspect

    Knight Rampager W/ Fleshmetal Fusion

    3x War Dog Karnivore (Havoc)

    3x War Dog Stalker (Melta/Claw/Havoc)

    2×3 Nurglings

    BA:

    Chief Librarian Mephiston
    Commander Dante

    3×5 Assault Intercessors with Jump Packs
    2×6 Bladeguard Veteran Squad
    Infiltrator Squad
    2×3 Sanguinary Guard
    1×6 Sanguinary Guard
    Scout Squad
    Invader ATV (60pts): Bolt Pistol, Close Combat Weapon, Twin Bolt Rifle, Onslaught Gatling Cannon
    2x Gladiator Lancer
    2x Impulsor

    For a breakdown of my infernal lance list: Click here

    The Mission and initial gameplan

    We rolled Hidden Supplies/Hammer and Anvil on GW layout 1. I won the roll to determine where the extra middle objectives go and put them in the open so if he wanted to hold any objectives in the center I would be able to put my despoiler into whatever was there. My gameplan was simple, draw out the sang guard, blow them up at range, and then carve through the rest of his army while trying to not lose too much to the lancers. I reserved a Karnivore and a unit of nurglings. He reserved a small sang guard unit.

    This was what deployment looked like at the end:

    Round 1

    I went first, selected my -1 to hit army rule, and drew Engage on all Fronts and No Prisoners. I knew I could score full engage easily by moving the nurglings over the line and having my bottom Stalker scout forward. Everything else simply moved to stage for next turn, getting as much cover as possible. He had put both lancers behind the L in his deployment, so I knew that as long as I didn’t sit in the center, I could make it impossible to shoot them this round.

    It was here I make an aggressive play. I saw red and tried to score No Prisoners by having the Stalker kill the scout squad in the center. I mostly wanted to remove his ability to score a free area denial/establish locus/cleanse, but the stalker has very low quantity of attacks, and I only killed 4 scouts and also put my Stalker in harm’s way. The small benefit to this was that if he wanted to shoot it with lancers, he would have to expose them to atrapos/despoiler shooting. He’d also have to deal with a war dog that wasn’t on any objective and was placed in a way any melee that went into it would be killed with shooting. I think in hindsight I just stage the stalker behind the wall next to the Atrapos, but war dogs are there to draw out his forces for the big lads to deal with, and it did do that. BA only have a few units that can effectively kill my units, so any of them coming out was worth trading a dog.

    I am unfortunately maximally punished by leaving one scout alive, as he passes his battleshock test and then draws Extend Battle Lines and Secure No Man’s Land. He charged JPIs and a small sang guard at the Stalker on the top objective (which he oathed), while the solo scout stood defiantly in front of my despoiler and claimed a second objective for secure. One unit of bladeguard hopped out of their Impulsor and the Impulsor bravely went forth to score the other part of secure.

    Meanwhile, the other two JPI squads went after the exposed Stalker, and Mephiston followed them, relatively safe with his lone op. He chucked a grenade and then charged both JPIs at the Stalker, doing 9 mortals in total. I heroiced with the Atrapos into one of the JPI squads and popped the defensive empowerment on the top Stalker, bouncing the sang guard and then killing one on the crackback.

    Small sidenote: I can’t overstate how huge the 5++/6+++ in melee is when we previously had no invuln. That sang guard unit went from dealing an average of 8 wounds to 5 wounds. Coupled with the JPIs hitting the stalker, that was the difference between being bracketed and not.

    At the end of round 1: the score was 14-19 and the boardstate was this:

    Round 2

    I score 10 points for holding the top and bottom objective (shoutout to not getting bracketed because of unholy fortitude) and draw Recover Assets and Bring it Down. Perfect, I have a delicious Impulsor just sitting there and the despoiler can easily action and shoot. The Atrapos stickies the bottom objective with a strat, and a Karnivore goes up to bail out his Stalker friend and the other Stalker goes hunting for the Impulsor. I elect to not expose my despoiler because I need it to handle the big units of bladeguard and sang guard, and I know as soon as I show it, both lancers are going into it. The Rampager takes this moment to position and kill that one poor scout harder than any scout has ever been killed.

    Unfortunately, things start going bad here. The Atrapos moves to shoot Mephiston and manages to get some damage through but doesn’t kill, so I elect to charge both the invader ATV and Mephiston so that he can present a massive problem and tie up my opponent in his home for this round. I rolled a 6 on the charge, and if I had selected one or the other target, I’d have made it, but the multi charge required a pivot I hadn’t accounted for, so the charge failed. I needed all my CP for my opponents turn since I knew I would need to interrupt and probably also pop several defensive strats, so I accepted my fate and cried.

    Meanwhile, the Stalker blasted the Impulsor for 9 damage in shooting and I thought, ‘surely a Stalker can do 2 damage to an Impulsor with +1 to wound and in range of the reroll aura of the Rampager.’

    You would be wrong. 3 2s into a 1 meant I sit there like a chump, scoring 0 on Bring it Down but at least denying all of my opponent’s primary (this will be an ongoing theme). I pitch Bring it Down because I need CP and score Recover.

    On his round 2, he drew Storm Hostile and Defend Stronghold, then failed the battleshock on the Impulsor and Mephiston. Because fate is cruel and I had pitched Bring it Down, he desperate escaped and failed. Dante’s big brick of sang guard, a unit of bladeguard vets, and the two lancers positioned to take down the atrapos. I had 4 CP to work with, so I ingressed a Karnivore right belowthe Atrapos to threaten a heroic and I gave the Atrapos a 4++ in shooting. I managed to only take 7 damage from the lancers, forcing a charge from the sang guard and bladeguard. I heroiced the Bladeguard with the Karnivore, tagging some to stop them from being able to hit the Atrapos. Another bad break happened here as Dante’s unit popped off and killed the Atrapos through the 5++/6+++. This meant the bladeguard could go fully into the Karnivore and I had to spend my last CP on our Armor of Contempt strat to save on 4s, soaking the squad reasonably well and then killing 3.

    At the end of round 2, the score was 27-26 and the board looked like this:

    Round 3

    Now that things have been exposed, it’s time to kill. I draw cleanse and sabotage. While two action secondaries sucks here, it’s not as bad as it seems since the despoiler wants to shoot stuff and can action, and he blocked me from moving into his deployment up top, leaving the dogs there with nothing to do aside from kill JPIs. I decided I’m gonna use sabotage as extra CP and move the despoiler down to deal with the bottom of the board while the rampager walks into the center and holds both objectives at once. My opponent ingresses Sang Guard into his home ruin so they can try to deal with the rampager and we move on to the shooting phase.

    With the power of sustained hits and ignore cover, the despoiler turns the sang guard into chunky marinara and leaves Dante at 2 wounds. Meanwhile, the rampager charges Mephiston and his JPI friends, tank shocking Meph into the dirt and vaporizing the JPIs. The Karnivore on the bottom charges Dante and takes him out while his friend tragically loses his life to the remaining bladeguard vets.

    At this point, I hold every objective in NML and my opponent has two lancers and a unit of bladeguard that can meaningfully threaten my knights, who are both at full. He draws Area Denial (lol, lmao) and No Prisoners. He decides to full send at the rampager and both lancers fail to get a single wound through. Ruh-roh. I pop unholy fortitude and bounce the sang guard and then use Hellforged Construction (armor of contempt) to save on 4s against the Bladeguard. The rampager goes to 15 wounds and then scoops up the sang guard on the crackback.

    Meanwhile down south my sweet, innocent Karnivore gets punked by bolt pistols and frees up the bladeguard to charge the other karnivore, who proceeds to get his ass kicked, taking 10 wounds and failing to kill any. But he doesn’t die, which is really what matters. My opponent scores baby No Prisoners, pitches Area Denial, and weeps for what is to come.

    At the end of round 3, the score is 42-28, and the board looked like this:

    Round 4

    At this point things begin to move quickly. I draw Tempting Target and Overwhelming Force and score max Primary. My Karnivore gets scared of the Bladeguard Vets, becomes battleshocked, and falls back. Desperate Escapes are not real and cannot hurt you. Papa Despoiler comes down to give the Vets a stern talking-to and the Rampager gives his new Bladeguard friends a big, fatal hug. The Karnivore up top zooms 17″ by the lone JPI currently drowning in Nurglings and charges the lancer. My Opponent now has a single lancer at his disposal (also an invader ATV that has failed to wound all game and an impulsor tucked away to do actions).

    On his turn, he draws Establish Locus and Marked for Death. I choose the two bigs and the nurglings in my deployment for Marked and he picks the Karnivore on the top objective as his pity target. The lancer decides it can wound stuff now that the game is functionally over and blasts the Karnivore to death for 2 points. The Force a Breach Challenger card is also drawn and the Impulsor scores it for 3 points.

    At the end of round 4, the score is 65-33 and the board looks like this:

    Round 5

    My turn to draw Marked For Death and Establish Locus. The Karnivore in his home Establishes the locus and the rampager has a delicious Impulsor for dinner, dealing 24 mortal wounds before also handing him 5 invuln saves. My opponent is tabled and we call the game.

    Takeaways

    My biggest takeaway is that people should be running vindicators instead of Lancers. The two shots from the lancer is just too swingy, whereas the Vindicator can potentially one-shot a knight and I have to play around that fact. Unholy Fortitude (the 5++/6+++ empowerment) was amazing and while I think Lords of Dread has a solid matchup here because of the -1 damage strat, being able to bounce sang guard in melee was extremely clutch.

    My other takeaway is more of a reminder to measure your charges and not get greedy. Yoloing the multi-charge on the Atrapos cost me at least 3 points, and the Stalker charging scouts r1 was basically always going to end up as a whiff.

    Hopefully you enjoyed reading this battle report. I have two more on the way against Custodes and Death Guard, so stay tuned for those!

  • The Who

    Howdy, my name’s Jake aka the Bald Brawler and I love Chaos Knights. I’ve one-tricked this army from mid 9th edition onwards, topping out at 5th worldwide for the faction in 2023 and bobbing around in the top 20 since then. I had 108 games of CK played in Pariah Nexus (almost all on the exact same 13 war dog list) and since our codex dropped I have been putting as many reps as life has allowed.

    The results have been, uh, pretty good.

    The What

    My Infernal Lance list is as follows:

    Knight Despoiler (Double Gatling, Ruinspear Rocket Pod, Melta) W/ Bestial Aspect
    • Warlord
    Chaos Cerastus Knight Atrapos
    Knight Rampager W/ Fleshmetal Fusion
    3x War Dog Karnivore (Havocs)
    3x War Dog Stalker (Melta/Slaughterclaw/Havocs)
    2x3Nurglings

    The double gatling despoiler (gatman) is the all-star of this list. 36 s6 -2 2d shots with either sustained or lethals as the situation demands makes him a perfect all-rounder threat. Bestial aspect plus an infernal boost gives him a 13+d6″ movement characteristic and combining that with towering means this bad boy *will* see what he needs to see. The despoiler aura is also *extremely* relevant in this detachment, helping your war dogs pass move leadership tests and take less mortals.

    The Atrapos is another all-rounder, able to act completely independently. The output can be very swingy, but it’s high strength, high ap, and high flat damage so your opponent has to respect it. You’re basically never have a bad target, and the built in extra speed and invuln means you can use your empowerment for damage without sacrificing utility or durability. Alternatively you can just move 15″ and go draw whatever lines of sight you feel like.

    The Rampager is the nuclear bomb of the list. Fleshmetal Fusion makes him functionally immune to chip damage and gives him enough extra durability to be A Problem, while his output threatens anything in the game.

    The Karnivores are your fire-and-forget missiles, able to move a blistering 17″ and then crash in with sustained and lethal. If your opponent wants to be safe from them, they have to be effectively out of the game in the back of their deployment.

    The Stalkers are your first wave, allowing you easy early pressure by threatening to move 21″ (base movement+3+6″ scout) and charge if you get a first turn. You’re rarely going to do this because stalkers are still inconsistent as hell in melee, but the threat of it will keep your opponent wary. Plop them on objectives early, get them into corners for actions, and generally be a nuisance.

    Lastly, Nurglings are here to guarantee you have places to scout into if you’re facing an army with lots of infiltrators/scouts or conversely to screen your backfield to let your bigs move forward after you sticky your home.

    The Why

    Let’s address the elephant in the room first: Why Infernal Lance over Lords of Dread? This is mostly a logistical issue for me, as my next major tournament is a team tournament and I need to fly there, and I can’t transport 5 bigs easily. This Infernal list fits perfectly into my carrying case.

    The other reason is flexibility. Lords of Dread is a massive stat check (and is fun as hell.) But Infernal has tools for every situation and a ton of room for skill expression. Historically, CK’s worse matchups were melee armies with high AP since we lack an invuln save in melee. Infernal handles this while also providing several other defensive options and complimentary offense.

    Also, I think Lords of Dread is gonna get smacked with a nerf bat (all bigs going up 20-30 points) and Infernal will survive that. Since my next major is going to be post-dataslate, I’d rather my prep time be effective.

    The How

    The name of the game for this list is pressure. While the war dog nerfs are felt, in this detachment they are ludicrously fast and substantially more durable. The threat of popping your 5++/6+++ and making some invuln saves against threats that would normally pick up your dogs with no save (like Bloodthirsters, other knights, and any AP3 melee) and then being able to crack back with something as threatening as a karnivore puts your opponent in a series of no-win situations.

    In deployment, I almost always put a Karnivore in reserves to keep my opponent honest, with the plan to ingress it t3 into their backfield or somewhere where it can threaten their home (with 17″ move that is…most of the no man’s land). Additionally, if I’m against a list without a lot of scouting or infiltrating unit, I’ll reserve a unit of Nurglings to either come in to accomplish a secondary like Behind Enemy Lines or, more often, to screen out another area of the board once I’ve stickied an objective with a knight. Nurglings ingressing near a knight is also an option to keep in mind, as a heroic from them can really destroy the math for a charging unit and swing a combat.

    My first drop after nurglings to secure scouting lines is usually the despoiler sitting behind obscuring on my home objective. It can reach basically anywhere so putting it in a neutral position doesn’t give my opponent much info and forces them to drop twice and inform my next drops. After the despoiler, I’ll usually either put down some Stalkers in obvious scouting lanes or put the Rampager right next to the despoiler. His job is to move up and be in a safe pocket for a turn or two, threatening to kill whatever my opponent puts out to deal with the stalkers. The Karnivores tuck in wherever there’s room, as they’re fast enough to get where you need and you’ll rarely want them going forward round 1 because they’re very valuable.

    Finally, the Atrapos will come down once I see where their anti-tank or big monsters/vehicles are. If it’s possible to pick off a valuable target like a vindicator with him, I’ll deploy him to grab that sightline and also threaten a side objective. Otherwise, he’ll go be a problem elsewhere, doing actions like cleanse or sabotage and taking pot shots at stuff.

    In my mind, the Atrapos is more of a distraction than anything, because it is so independent and does every role well but not amazing, I consider its job to draw my opponent into bad positions to deal with it so the real damage in the list can take out those tools.

    Next let’s talk about the detachment itself and how best to use it. In general, round 1 you want to empower as few units as possible to save yourself some potential damage. Most of the time, round 1 is just staging, so you aren’t going to be shooting or fighting much and you’ll mostly be using the empowerment to move. After that, I empower every unit unless it’s at half or slightly above half wounds, because a failure and the subsequent mortals could force me to battleshock.

    For strats, I tend to save at least one CP to double empower and will aggressively bin any secondaries I can’t max to fuel my CP generation. Since we’re such a primary bully, we can afford to go down in secondary scoring early (because it also usually means our opponent can’t get any challenger cards and scam us).

    I usually won’t sticky my home turn 1 because the despoiler will chill there until 2 where there are juicier targets. This also means we have 2-3 CP going into t2 to use for interrupts or heroics.

    Also, stop using Diabolic Bulwark. Just roll 5s instead. Seriously, that cp you use to maybe make a save is better used rerolling a failed save most of the time. Or just accept you’re going to be taking losses. Or, as previously stated, just roll 5s.

    A quick bit about our army rule. If you’re playing against a long-range shooting army like Guard, Tau, etc, I will usually pick -1 to hit round 1. If your opponent is an army that can easily get within 18″ to shoot you, don’t bother with it. In this detachment, I’ve found taking the +3″ to auras round 1 has actually been extremely relevant, allowing more dogs to benefit from rampagers re-rolls and the despoiler’s leadership bonus. On round 3, I analyze the board-state and if there’s a lot of units below starting strength but not below half, I’ll take the battleshock below starting. Otherwise, I’ll either take the extra -1 leadership or roll and see what happens.

    What about X?

    I’ll try to head off some questions here. We’re pretty lucky in that most of our big knights are somewhat viable, but I think this current list is the best possible combination. I’ve thought about using a double thermal cannon despoiler with bestial aspect, or a second gatman, but both options sacrifice the melee and speed that the atrapos brings. I think a second gatman is totally viable if you don’t have an atrapos, but I think the thermal cannon variant is bad. The blast means they tag it with a rhino and you now have a 335 point paperweight. Not to mention you have to get close to their army to utilize it properly, while the gatman hangs out across the board and drowns your opponent in volume.

    There’s also battle cannons. Don’t take battle cannons.

    Let’s also talk about the two enhancements I’m not taking. I think Knight Diabolus is bait. Spending 25 points to make something not very good at melee slightly less bad at melee isn’t what I want to be doing. In general I see people taking this on the abominant and I think the abominant is still a bad model (unless you’re running multiples in lords). I think putting it on an Atrapos is compelling, but ultimately a unit of nurglings is better value than one enhancement. Blasphemous Engine is just too expensive. +2 wounds doesn’t feel equal to +1 toughness for me.

    I think the other war dogs also sadly don’t make the cut because you need the Stalkers for early pressure and neither the huntsman or the brigand are going to be as effective as the karnivore. Executioners are also technically a datasheet.

    That’s all, folks

    Thank you for reading the write-up. If you have any questions, please comment and I’ll try to answer them. I’ll have battle reports coming up with this list in the near future so stay tuned for those!